|
 THE "DO IT YOURSELF" HOME SMOKER THE "DO IT YOURSELF" HOME SMOKER
The prototype smoker described in this article cost less than Ł10 and was built in under an hour using a few simple tools. All parts were purchased
from local hardware and "discount" stores. Exact sizes of trays, nuts and bolts, etc. are not given as these may be varied to suit items available
at the time of purchase.
Parts Required
- Two "Turkey" roasting tins with internal dimensions of approximately 13" * 10.5". These must be of the "tin" plated (cheap) variety; "Non-Stick" tins are not suitable for this purpose.
- A baking tray (non-stick is okay for this) that will fit inside the roasting tins (mine was 12" * 9.5"). This acts as a drip tray and stops drops of water from the fillets from dousing the oak chips.
- Two wire cake stands (racks used for cooling cakes, loaves, etc. after cooking). These should be chosen for a width that matches the drip tray and will almost certainly be too long for the roasting tins but will be cut to size.
- A cheap 12" hacksaw blade, this will be bent to form a clip for the lower rack and baking tray.
- Four nuts and bolts (approximately 2" long) to form feet and internal support for the baking tray.
- Two smaller nuts and bolts (approximately 2" long) to be used as locating lugs for the top and base of the smoker.
- About 8" of brass or aluminium tubing, the tubing should be slightly smaller inside than the little wire bends that form the legs of the cake stands. During the building of the smoker this tube will be flattened slightly and will then fit these legs (See Picture 7).
Tools Needed
- A hacksaw (standard or junior).
- A drill, this may be a hand drill or an electric drill, I used a cordless screwdriver.
- Three drill bits, one bit to match the size of the larger bolts, one to match the smaller bolts, and one used to provide a clearance hole for the nuts of the smaller bolts (i.e. it should make a hole that the nut from the smaller bolts will drop through).
- A pair of tin snips or wire cutters (the hacksaw could replace these but will make life a little more difficult).
- A pair of long nosed pliers, if you can find an alternative way of bending the hacksaw blade or another method of forming a clip then these will not be needed.
- A pair small clamps used to hold the roasting tins together while drilling the locating holes. Alternatively, the roasting tins may be taped together.
- A small hammer and a centre punch (a four inch nail can be substituted for the punch).
Building The Smoker
- Clamp or tape the roasting tins together and drill a small hole in two of the corners or two sides if preferred (Picture 2) using the centre punch first to form a small dent that stops the drill bit skidding about.
- Separate the roasting tins and fit the two smaller nuts and bolts in the holes in one of the roasting tins; this tin will be used as the lid.
- Select the other roasting tin (this will form the base) and enlarge the holes so that the nuts from the lid tin will fit through them (Picture 3).
- Drill four holes in the base tin and fit the four larger nuts and bolts so that approximately 3/4 of an inch of each bolt is visible inside the tin (Picture 4).
- The two wire racks should fit inside the roasting tins as far as their width is concerned but will probably be too long. Use the hacksaw and wire cutters to remove the last section from each end of each tray (Picture 5). The two racks should now be of similar size to, or slightly smaller than, the baking tray.
- Bend up the ends of the hacksaw blade so that the baking tray fits in it. Place one of the wire racks on the baking tray and make a second bend in each end of the hacksaw blade. The hacksaw blade should now form a clip that holds the baking tray and the first rack together (Picture 6). This clip is not absolutely necessary but makes it easier to handle the rack and baking tray when the smoker is in use.
- Cut the brass or aluminium tubing into four pieces of about 2" in length. Take these and gently flatten them with the hammer. They should not be squashed completely flat but just enough so that they may be tapped onto the existing (bent wire) legs of the top rack in order to lengthen them (Picture 7). When all four tubes have been fitted place this rack over the lower rack and baking tray combination and gently bend the legs inwards until they clear the lower rack and rest on the baking tray (Picture 9).
The smoker is now complete and you are ready to try it, the method of curing and smoking that follows is one that I use regularly and it produces good
results, if you have your own method or wish to try someone else's then feel free.
Curing and Smoking
First catch your fish and then clean and fillet it, you can split the fish and smoke it whole but the bones can be a nuisance and most people seem to
prefer fillets. I don't remove the skin when filleting as it holds the flesh together during cooking and is easy enough to deal with when eating the fish.
Once filleted the fish must be cured, either a brine cure (wet) or a salt cure (dry) may be used but I find that the following, dry salt cure, is the
easiest. The reason for the curing, apart from improving the flavour, is that without it the fish will be too wet for smoking and the moisture produced
during the hot smoking (cooking) will "wash off the smoke" resulting in a poor flavour.
Sprinkle a layer of cooking salt in a tray and place the fillets, skin up, onto it and then cover with another thin layer of salt. Place the next pair
of fillets on top and cover with salt; repeat the process until you run out of fillets. If you prefer it you could use a mixture of two parts salt with
one part soft brown sugar but I don't bother.
Leave the fillets for about three hours, more or less depending on how salty you like your smoked trout.
Wash the fillets thoroughly in cold water and pat dry with a paper kitchen towel, at this stage some like to brush the fillets with olive oil but,
again, I don't bother.
Place a couple of hands full of oak chips in the base of the smoker (Picture 8), put in the drip tray and bottom rack and place a couple of fillets on
bottom the rack, skin down. Now fit the top rack and place a couple more fillets on it, skin down (Picture 9). The lid of the smoker should now be
lined with aluminium foil, this is replaced each time that the smoker is used and prevents wood tar from accumulating on the inside of the lid. If
this is not done then repeated use of the smoker will lead to a build up of wood tar that will drip onto the fillets spoiling the appearance and taste.
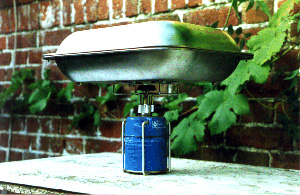
As picture 10 shows, I use the smoker in a garden shed (workshop) which has an extractor fan, you can do it outside, in the garage, or even in the
kitchen if you like but the smell is penetrating and lingers for days! The heat source I use is a "workman's" gas ring run from a butane gas bottle
but as an alternative you can use a "camping" gas stove (Picture 12). Some smokers use a methylated spirits stove, you can if you wish but it is not
as controllable as gas and is a greater fire risk unless treated with care and should never be attempted in doors.
Put the lid on the smoker and place it on the gas ring, the gas should be lit and turned up high until smoke starts to escape from the smoker. At
this point the gas should be turned down so that the flames don't quite touch the smoker base (Picture 10) and a very small trickle of smoke
escapes. Wait patiently for twenty minutes (you can fill in time by preparing a salad or potatoes or a rice dish to accompany the fish) and then
turn off the gas. The trout will now be ready to eat (Picture 11). |